Gel-X Extension Removal: Safe Methods and What to Avoid
If you've been exploring the world of soft gel nail extensions, you've probably already discovered how beautiful and wearable Gel-X nails can be. But there's one part of the Gel-X experience that doesn't get talked about nearly enough: removal. Proper gel-x extension removal is just as important as the application itself, and getting it wrong can set your natural nails back weeks or even months. Whether you're approaching the end of your wear cycle, dealing with a lift, or simply ready for a fresh set, this beginner's guide walks you through everything you need to know about removing Gel-X extensions safely, what methods actually work, and which shortcuts to avoid at all costs.
Why Gel-X Extension Removal Is Different from Other Nail Services
Gel-X extensions are made from a soft gel formula that bonds directly to your natural nail using a UV or LED-cured gel base. This bonding is what makes them so durable and flexible during wear, but it also means they can't simply be peeled off or popped loose without consequences. Understanding the structure of the product helps explain why gel-x extension removal requires a specific approach.
Unlike press-on nails that use temporary adhesive tabs, Gel-X extensions cure onto your nail plate at a molecular level. The soft gel material is also different from traditional acrylic: it doesn't file down as easily and responds best to acetone soaking rather than mechanical removal. If you've ever wondered how gel-x vs acrylic nails differ in their removal process, this is one of the key distinctions: acrylics are often filed down first, while Gel-X relies primarily on a soak-off method.
The natural nail underneath a Gel-X extension is still alive and growing. The thin layer of nail plate that gets prepped during application is susceptible to damage if force is applied during removal. This is why the method you choose, and the patience you bring to it, matters so much.
The Gold Standard: Professional Gel-X Extension Removal
The safest and most reliable way to handle gel-x extension removal is to have it done by a trained nail technician. At a professional salon like Thi Spa & Nails in San Francisco, the removal process is controlled, precise, and designed to protect your natural nail from start to finish.
What Happens During a Professional Removal
A professional removal typically follows this sequence:
- Light surface filing: The technician gently buffs the shine off the top layer of the Gel-X extension to break the seal and allow acetone to penetrate more efficiently.
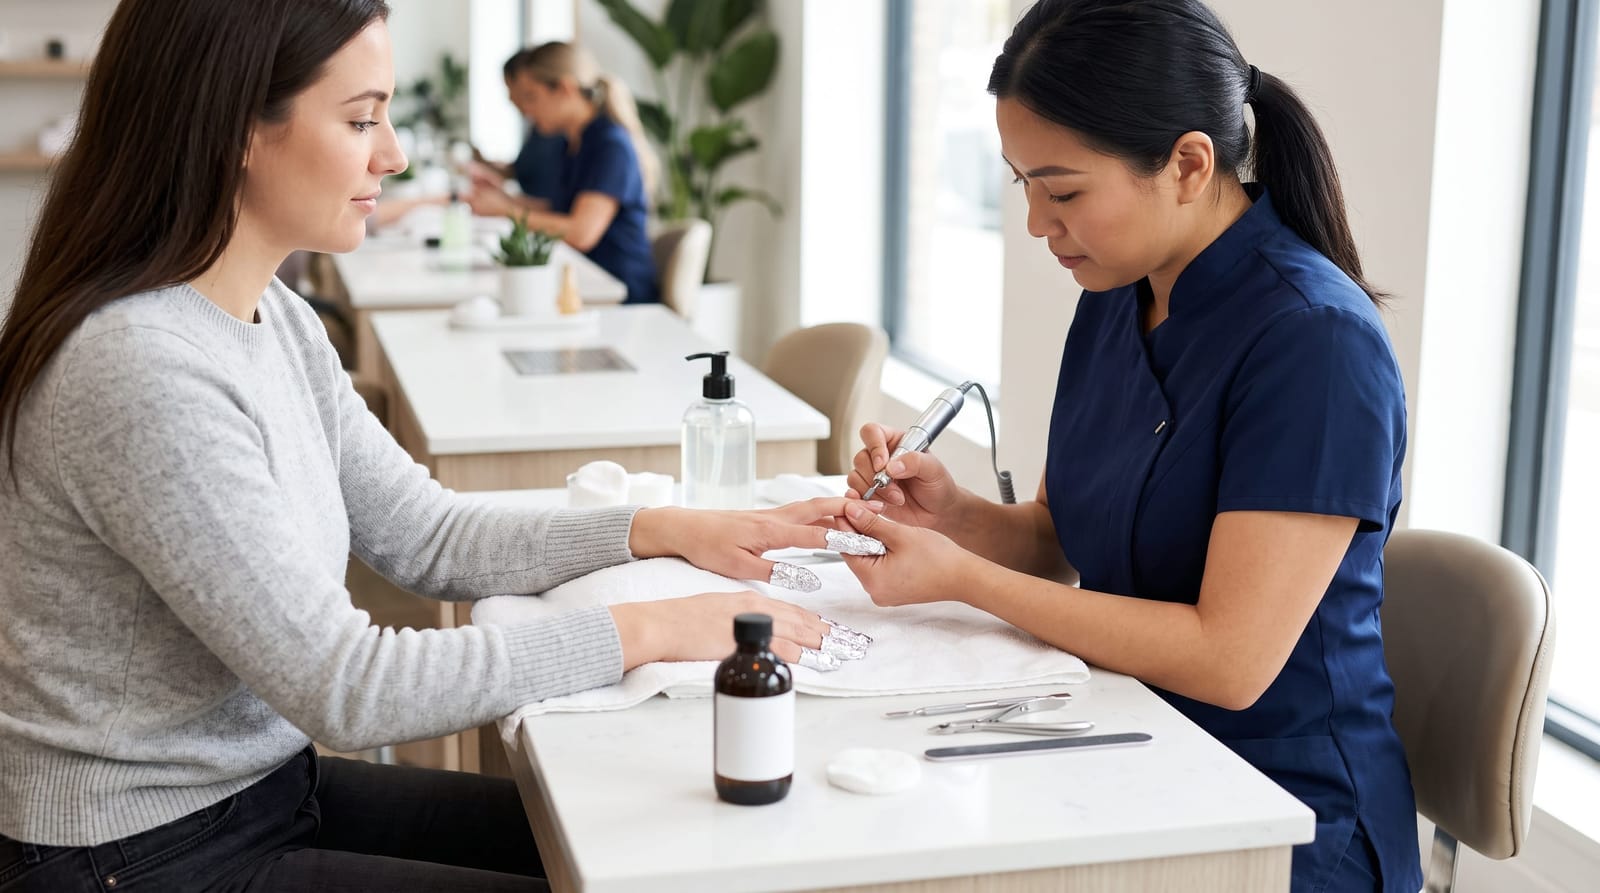
- Acetone soaking: Nails are wrapped in acetone-soaked cotton pads and foil wraps, or placed in a soaking bowl, for 10-20 minutes depending on the thickness of the gel.
- Gentle removal: Once the gel has softened and begun to lift, the technician uses a wooden cuticle pusher or a plastic scraper to gently ease the product off the nail: never forcing it.
- Nail assessment and care: After removal, the technician buffs away any residue, assesses the health of the natural nail, and applies nourishing oil or treatment as needed.
This process protects the integrity of your nail plate, ensures no product is forcibly torn away, and gives you a clean base whether you're getting a new set or taking a break. Professional removal is especially valuable if your extensions have been on for a full wear cycle, typically three to four weeks, or if you've noticed any lifting, which can trap moisture and create other concerns.
At-Home Gel-X Extension Removal: The Acetone Soak Method
If professional removal isn't immediately available, careful at-home gel-x extension removal using the acetone soak method is the most widely recommended approach for those who choose to DIY. For a more detailed walkthrough of the at-home process, see our post on remove gel-x extensions at home, but here's a foundational overview of what the process involves.
What You'll Need
- 100% pure acetone (not regular nail polish remover)
- Aluminum foil cut into small squares
- Cotton balls or cotton pads
- A wooden cuticle pusher or plastic scraper
- A nail buffer (fine grit)
- Cuticle oil or a nourishing hand cream
- A glass or ceramic bowl (avoid plastic, which can react with acetone)
Step-by-Step Overview
- Prep your workspace: Work in a well-ventilated area away from open flames. Acetone is highly flammable.
- Lightly buff the top coat: Use a fine buffer to remove the glossy surface layer of the extension. This step is often skipped at home and leads to much longer soaking times.
- Soak cotton in acetone: Saturate small cotton pieces with pure acetone and place one on each nail.
- Wrap and wait: Secure each cotton piece with a foil wrap. Wait at least 15-20 minutes: resist the urge to check too early.
- Test and gently push: Remove one wrap and test whether the gel has softened. Use a wooden pusher to gently slide the gel toward the tip. If it resists, rewrap and wait longer.
- Buff and nourish: Once all product is removed, lightly buff the nail surface, then apply cuticle oil generously.
Patience is the most important ingredient in at-home gel-x extension removal. Rushing this process is where most nail damage happens.
What to Absolutely Avoid During Gel-X Extension Removal
Understanding what not to do during gel-x extension removal is just as important as knowing the correct steps. These are the most common mistakes that lead to thin, peeling, or damaged natural nails.
Never Peel or Pop Off Extensions
Peeling a Gel-X extension off before the gel has fully softened tears away layers of your natural nail plate along with the product. Even if it feels like the extension is "almost ready" to come off, forcing it causes micro-damage that weakens nails over time. This is the single most damaging thing you can do during gel-x extension removal.
Avoid Metal Implements Without Training
Metal nail tools, especially metal pushers or files, can scratch and gouge the nail plate if used incorrectly. Professionals are trained to use these tools at safe angles and with appropriate pressure. At home, always stick to wooden cuticle pushers or plastic scrapers.
Don't Skip the Buffing Step
Jumping straight into the acetone soak without first breaking the gel's surface seal means your acetone has to work much harder and longer to penetrate. The result is often a partial soak that leaves stubborn product still bonded to the nail, which then tempts people to scrape harder than they should.
Avoid Regular Nail Polish Remover
Standard nail polish remover contains only a small percentage of acetone and is simply not strong enough to break down the cured soft gel used in Gel-X extensions. Using it will leave you soaking for a frustratingly long time with little result. Only 100% pure acetone is effective for gel-x extension removal.
Don't Ignore Nail Condition After Removal
Acetone is drying by nature. Skipping the post-removal nourishment step, cuticle oil, hydrating hand cream, or a nail strengthener, leaves nails brittle and more prone to breaking. This is an easy step to overlook, but it makes a significant difference in how quickly your nails recover.
How to Know When Your Natural Nails Need a Break
One of the most thoughtful things you can do after gel-x extension removal is honestly assess the condition of your natural nails before booking your next set. Even the most careful removal process involves some exposure to acetone, and repeated cycles without rest can gradually thin the nail plate.
Signs that your nails may benefit from a recovery period include:
- Visible white spots or discoloration on the nail surface
- Unusual thinness or flexibility in nails that were previously strong
- Peeling or layering at the free edge
- Sensitivity or tenderness around the nail bed
- Excessive dryness in the cuticle area that persists after moisturizing
If you notice any of these, consider a break of one to two weeks with consistent cuticle oil application before your next gel-x extension removal and reapplication cycle. This is general guidance, if you have specific concerns about nail health, a licensed nail technician can assess your nails in person and make recommendations suited to your situation.
It's also worth noting that how long you wear each set affects your natural nails over time. If you're curious about timing, our guide on how long do gel-x extensions last covers realistic wear cycles and how to maximize longevity without stressing your nails.
Professional Gel-X Extension Removal in San Francisco
For clients in San Francisco, whether you're near Nob Hill, the Rincon neighborhood, or visiting around the Convention Center, Thi Spa & Nails offers professional gel-x extension removal as a standalone service and as part of a full-set appointment. The team is experienced in soft gel extension care and uses a removal process designed to preserve the health of your natural nails.
Choosing professional removal isn't just about convenience. It's about having a trained set of eyes on your nails at a critical stage: someone who can identify early signs of lifting, assess the condition of your nail plate, and prepare a clean, healthy base for whatever comes next. That level of attention is hard to replicate at home, no matter how carefully you follow the steps.
If you're unsure whether your current set needs removal, a quick consultation at the salon can help you make an informed decision before the process becomes more complicated.
Key Takeaways and Next Steps
Gel-x extension removal is a step that deserves the same care and attention as the application itself. Here's a quick summary of what to remember:
- Always use the acetone soak method: never peel or force extensions off
- 100% pure acetone is required; regular nail polish remover won't work
- Buffing the surface before soaking speeds up the process significantly
- Metal tools should only be used by trained professionals
- Post-removal nail care, especially cuticle oil, is essential, not optional
- Allowing nails to rest between sets supports long-term nail health
When in doubt, professional removal is always the safest choice. If you're in San Francisco and ready to have your Gel-X extensions removed, or want to start fresh with a new set, book an appointment at Thi Spa & Nails and let our team take care of every step of the process, from safe removal to a flawless new application.